Since we've decided not to reveal much more of Steve on the blog, I decided I'd give a
of SOME of the ::gasp!:: handwork (yes, I believe I always DO gasp before doing handwork) that goes into making the Saint's New Clothes.mind-numbingly-boring
blow-by-blow
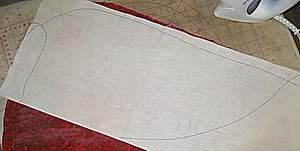
Before even touching the already-painted fabric, I trace a section of Steve (in this instance it's part of his cloak) onto a specially-treated tissue paper. No, it's not all that exotic (you do remember my fancy painting studio, don't you?) - it's the paper that the 'girls' put on the manicure table when you get fake nails. Waxed/plastic'd on one side, tissue-y on the other. Useful for a multitude of tasks, almost as important as Glad Wrap Press 'N Seal in my sewing arsenal.
Okay. Trace a section, roughly cut it out. Find the fabric, iron it (again), lay the tissue on the fabric and cut the fabric to the kinda-same-size-and-shape.
Find a clean but ancient piece of unbleached muslin. Iron it. Lay the muslin on the paper pattern and trace the outline with a blue or red chalk pencil.
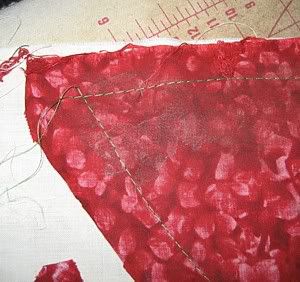
 Hey! Now the pictures start! Lay the drawn-upon muslin on the fabric, put obnoxiously-colored thread in the sewing machine (both top and bobbin) and sew along the chalk line with basting stitches.
 I learned on this first one to break up the lengths of basting on long sections, to make it easier to remove the basting later. Of course I learned this the hard way, since this piece is the largest of all that are being "processed" this way.
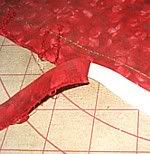
 Using, at times, two sticks and a fingernail (but always at least one stick), fold back the raw edge and press. Clip or notch as required.
Corners and tight spaces really require sticks, fingernails, steam and holding my mouth just right. (Occasionally I belted out a few notes from "God Bless America", but that was only when the iron collided with my skin.)
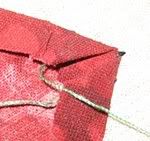 This picture shows making a little "edge" that's about 5 threads wide. It's a piddly thing and won't be identifiable from 20 feet away, but it does make a difference in the overall shape of the ... uh... shape.
 Sheesh, did you actually get this far through the yawn-fest? The final piece, with all of the edges pressed under, ready to be pinned to the wall like a pretty butterfly.
Yeah. I did that. To all of the big and little pieces. Then I ::gasp!:: hand-basted all of the pieces of the puzzle together.
No comments:
Post a Comment